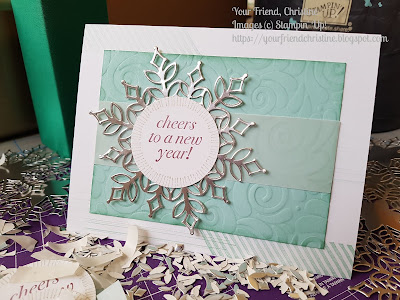
Even with the best intentions to send cards on time for Christmas, some friends slipped through the cracks. A new year's card is a great way to send well wishes and in this case, a chance to use stamps from my collection. This design is a little different from my normal style - but it proves that very different elements can come together for a pleasing design. I chose two stamps from Gorgeous Grunge to reflect the movement of time. The giant snowflake is a focal point while an embossed panel and strip of vellum give a wintry touch. Sometimes it's all about the layers!
This project uses discontinued items, but you can still take inspiration from the colour scheme or composition.
Supply list for ten cards:
Stampin' Up! does not sell metallic ink - I used a Colorbox pad.
All the best for 2019 stamping friends!
This project uses discontinued items, but you can still take inspiration from the colour scheme or composition.
Supply list for ten cards:
Stampin' Up! does not sell metallic ink - I used a Colorbox pad.
- Whisper White 8.5x11" cardstock plus large scraps
- Pool Party 8.5x11" cardstock
- Silver foil cardstock
- Vellum cardstock
- Cheers to the Year stamp set
- Gorgeous Grunge stamp set
- Swirls & Curls Textured Impressions Embossing Folder
- Largest snowflake die from Snowflake Thinlits die set
- 1 3/4" circle punch
- Fresh Fig ink
- Pool Party ink
- Stamparatus may come in handy
- Big Shot, tear tape and Stampin' Sponges
 |
| Click for larger |
- Score five sheets of 8.5x11" Whisper White cardstock down the middle and cut in half to make ten card bases.
- Cut 2-3 sheets of 8.5x11" Pool Party cardstock into ten 3.25x4" panels.
- Emboss the Pool Party panels with the xxx embossing folder. You can sponge the edges with Pool Party ink or stamp the embossing folder with ink to leave a gentle touch of ink upon the embossed surface.
- Cut 10 x strips of vellum cardstock.
- On scrap pieces of Whisper White cardstock, stamp the radiating circle from Cheers to the Year in gold metallic ink. Inside the circle, stamp the sentiment in Fresh Fig. Punch out the circles with the circle punch.
- Die cut 10 snowflakes from a 12x12" sheet of silver foil cardstock. To minimize waste, trace around the snowflake on the blank side and cut by hand.
- Now, this is where the Stamparatus came in handy! Position a card base on the platform and line up the horizontal line stamp past the edge of the bottom left side. Ink it up with Pool Party and stamp stamp stamp! Do the same for the slanted line stamp, but on the top left hand side and bottom right hand side.
- Stamp the horizontal line stamp about midway on the right side of the card base.
- Center the embossed panel on the front of the card and stick down.
- Most adhesives will show through vellum, so just put a small piece of tear tape where the snowflake will be mounted.
- Mount the sentiment to the snowflake and then place the snowflake on the right side of the card. Try experimenting with tilting it until it looks just right.
All the best for 2019 stamping friends!

No comments:
Post a Comment