
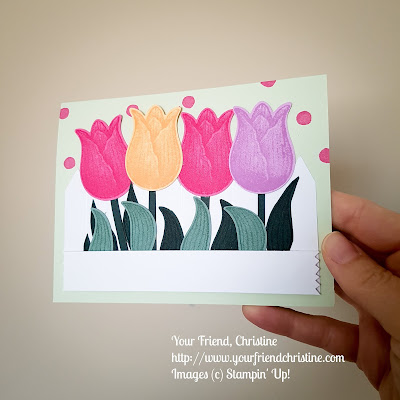
I’m a little behind sharing this project, but it’s still kind of springy where I live—cherry and apple trees are blooming! When the new In Colors were revealed, I instantly thought of card using Timeless Tulips and the co-ordinating Tulip Builder punch!
The fun part of this project is that you can stamp and punch oodles of tulips to mix and match. Try stamping with a matching colour or a bold combo like Magenta and Pale Papaya. The results may be surprisingly and pleasing.
Here are the supplies I used to make ten cards:
Instructions
Ta-da! You have your own miniature spring garden on a card to give for all those April and May occasions like birthday, Easter and Mother’s Day. You can stamp a sentiment on the front Basic White strip or leave it blank for a punched sentiment later on.
There are tons of fun possibilities with this idea. You’d could make an exploding card with scored fences or use the fence idea for the inside part of a Z-fold card, or simply decorate the outside of a pencil cup or centrepiece. Remember, I just provide the ideas and know how—you make it special!

The fun part of this project is that you can stamp and punch oodles of tulips to mix and match. Try stamping with a matching colour or a bold combo like Magenta and Pale Papaya. The results may be surprisingly and pleasing.
Here are the supplies I used to make ten cards:
- Basic White cardstock
- Variety of 8.x5x11” pastel cardstock like So Saffron, Petal Pink or Soft Seafoam
- Simply Scored score board
- Scissor Snips
- Dimensionals
- 2021-2023 In-Color inks
- Timeless Tulips stamp set
- Tulip Builder Punch
- 2021-2023 In-Colour cardstock variety pack
- Paper Trimmer
- Grey pencil crayon

Instructions
- Score, cut and fold a variety of bases from pastel cardstock bases.
- Stamp and punch rows of tulip blossoms on one sheet each of Pale Papaya, Polished Pink and Fresh Freesia.
- Stamp and punch rows of tulip leaves on one half sheet each of Soft Succulent and Evening Evergreen. Save scrap bits for tulip stems.
- Cut 2.5x5” pieces of Basic White to make the fence pieces.
- Cut 1x5” pieces of Basic White to make the front white strip for sentiments.
- Score the fence pieces in 0.5” increments with the Simply Scored score board. You only need to do a few markings on each side as the tulips will cover the middle area.
- Use the flat side of a grey pencil crayon to add some dimension around the score lines.
- Cut three notches for pickets on either side of the fence piece. Again, the tulips will cover up the middle, so don’t do work you don’t have to :-)
- Time to assemble! Affix the fence to the front of each base.
- Arrange four of the tulip blossoms as you like. You can attach them all together and then attach the stems, or you can add the stems first. You can pop up some of the tulip blossoms with dimensions—it’s up to you!
- Add the stems next—align them to the bottom of the card. Don’t worry if they overlap or look funny—they will be covered by the front white piece.
Ta-da! You have your own miniature spring garden on a card to give for all those April and May occasions like birthday, Easter and Mother’s Day. You can stamp a sentiment on the front Basic White strip or leave it blank for a punched sentiment later on.
There are tons of fun possibilities with this idea. You’d could make an exploding card with scored fences or use the fence idea for the inside part of a Z-fold card, or simply decorate the outside of a pencil cup or centrepiece. Remember, I just provide the ideas and know how—you make it special!