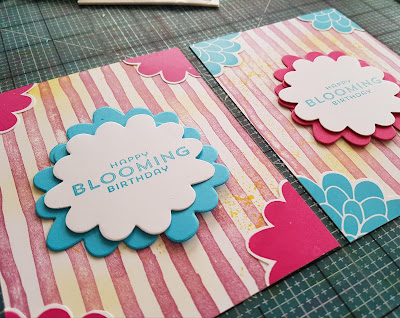
I have to get better at posting my projects at the beginning of the month instead of the end! I made a bunch of these card fronts to swap for OnStage Local 2017 and I was really pleased with the response to them. I think instead of using Whisper White cardstock, Very Vanilla could easily stand in to tone done the brightness...but that's up to you!
Hurry! The stamps and dies used in this project are retiring!
Supply list for 16 cards
Remember, you can always halve my project ideas, but this is another way to stamp a stack of cards that will be a thoughtful gift or provide birthday wishes throughout the year. It may seem too like the card has a lot of steps, but they work up quick with all the stamping and die cutting. I was able to make the cards in a week by the spreading out the tasks.
Hurry! The stamps and dies used in this project are retiring!
Supply list for 16 cards
- Whisper White cardstock (11 8.5x11" sheets) for card bases and flower die cuts
- Melon Mambo and Tempting Turquoise cardstock (1.5 12x12" sheets) for flower die cuts
- Brushstrokes background stamp
- Flower Fair thinlits dies
- Flower Patch photopolymer stamps
- Melon Mambo, Sweet Sugarplum, and Tempting Turquoise inks
- Simply Scored scoreboard
- Score Whisper White cardstock lengthwise at the 4.25" mark. Do not cut or fold.
- Sponge Daffodil Delight lightly all over the right side of the scored sheets. Follow-up by stamping the right side of the sheets with the spraypaint stamp from Touches of Texture, also in Daffodil Delight.
- Cut the sheets in half to make 16 card bases.
- Mask off the back of the card with scrap paper. Load up the Brushstrokes stamp with Sweet Sugarplum and stamp the front.
- Stamp all over the front of the card with the background stamp using Crumbcake ink.
- Now here's the fun part. You can decide to stamp the flowers however you like. As you can see from the samples, I did half Melon Mambo/solid flower and half Tempting Turquoise/regular flower. You will need to stamp a total of 28 flowers on Whisper White cardstock regardless of your colour choice. If you are careful, you can stamp 12 flowers to a sheet.
- Once the flowers are stamped, you can cut them out by hand or with the matching die. I ended up fussy cutting them all because I took them to work to get them done.
- Now for more flower making! Use the large flower die and cut out 28 flowers. You should have double the amount of stamped flowers. Tip: you can safely cut two sheets of cardstock with the die to save time.
- Cut 16 flowers with the large flower die from Whisper White cardstock and stamp with a sentiment. I used the birthday stamp from Flower Patch with Tempting Turquoise.
- Cut each stamped flower from step 6 into quarters with scissors. Don't worry about being perfectly accurate. Keep each set of quarters together, however.
- Adhere one flower quarter to the corner of each card. You may want to fold the card bases in this case to make it easier to adhere the quarters on the left side of the card front so it lines up with the edge.
- Now, divide your pile of non-white flower die cuts into two piles of 16 flowers each. One pile will stay solid. The other half will be cut in half.
- Place one solid flower upside down on your workspace and then two halves (also upside down) slightly apart so that there is an upside down V shaped gap between the two halves. Adhere the halves to the whole flower. You may want to use the first flower as a template for the others.
- Turn the assembled flower right side up and adhere the white sentiment flower to the front.
- Place a dimensional on the back of the assembled flower and adhere to the front of the card to make it bloom!
 |
| Click for larger size! |

No comments:
Post a Comment