I am a quasi-hobby independent Stampin' Up! demonstrator. I do not book parties but I specialize in one on one instruction plus I still wanted a space to show off my cards and share advice about stamping and papercraft. Enjoy! All stamped images and paper are (c) Stampin' Up.

Shop Now

Click here to shop Stampin' Up. You can order stamps and supplies without having a party and still get Stampin' Rewards.

Monday, 28 February 2022

February Crafting Project--Make Your Own Paper!

I thought I would have a February project for all y'all, but class is just keeping me so busy. The great thing about art classes is at least I can share a new techinique--papermaking!

If you're like me, you hate anything going to waste and you love being thrifty. Papermaking is the ultimate combo of recycling and thrift, plus it's easy to do if you don't mind a little mess. It doesn't require any special equipment to get started, and you can even buy starter kits from a company like Arnold Grummer with everything you need. There are whole books and lots of videos on papermaking--the possibilities are truly endless--so I'll just give a high-level overview here.

Here are some of the items you'll need:
  • A mold
  • Scrap paper, newspaper or cardstock
  • An old blender specifically designated for papermaking
  • Small cup or measuring cup
  • Sponges
  • Two tubs with a flat bottom
  • Absorbent paper for couching
  • Screens
  • Wastewater bucket
  • An old shirt or apron
  • Nitrile or rubber gloves
  • Plastic tarp or old tablecloth to cover your workspace

Cautions and Warnings
  • Pulping paper in a blender may release dyes that may stain. Wear an old shirt or apron and cover your workspace.
  • If you use a purchased dye, be sure to read all instructions before opening the package.
  • Don't throw wastewater down your sink. Paper fibres can settle in your pipes and create a clog. Collect wastewater in a pail and dump outside.
  • Some types of specialty paper won't pulp--foils and any plastic-coated paper--for example.


Here are some of the steps I take to make paper:

1. Gather your scraps! I used Night of Navy, but you can try mixing colours too, although black and grey scraps tend to turn everything black or grey. If you experiment doesn't work out, you can always save it as a sample or re-pulp it.
Pile of scrap cardstock
2. Rip it up! This part is kinda fun--and you can do it while watching TV! You don't have to go this small however.
Pile of scrap cardstock
3. Blend and pour into your mold. This is where things can get a little wet--but you'll have the makings of a piece of paper after swirling the pulp and water around. As you become familiar with the proces, you'll discover how much water to add to the blender.
Processed pulp in the mold
4. Screen and dry. In the photo below, I've screened out the water and am ready to couch the new paper between two absorbant sheets to speed up the drying process. When the sheet is dry, it will appear lighter than the original cardstock--but you can still stamp, sponge and cut it like it was a factory-made piece.
Screened and looking like a sheet of paper

I hope you enjoyed this brief insight into papermaking. If you try it, you'll soon fall in love with the world of possibilities, such as layering sheets, adding embellishments like glitter or flowers to the pulp and maybe even sculpting with it. Whatever you do, it will be unique because you made it!

Your Friend, Christine

Tuesday, 15 February 2022

Tuesday Tip--It's Okay for Embossing Plates to Crack and Scratch!

I started posting Tuesday Tips last year on Facebook, but quickly got behind once I started school. I got smart and made a year's worth in advance. But, in case you don't , you can still enjoy them every third Tuesday of the month.

Today's tip reads: Cracked, warped and marked die cutting pads are totally normal! Remember to use the whole surface (not just the middle) and flip them to prolong their life.

Tuesday Tip--embossing machine plates

Until next time...
Your Friend, Christine

Tuesday, 18 January 2022

Tuesday Tip--Retiring 2020-2022 In-Colors

I started posting Tuesday Tips last year on Facebook, but quickly got behind once I started school. I got smart and made a year's worth in advance. But, in case you don't , you can still enjoy them every third Tuesday of the month.

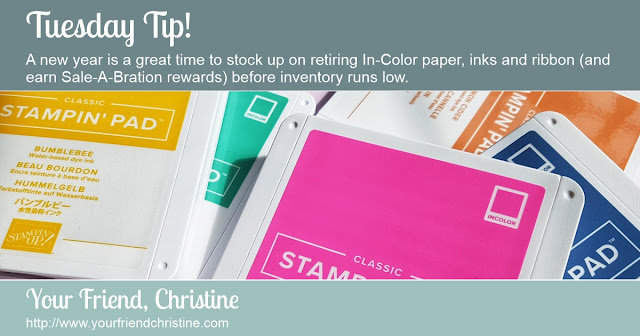
Today's tip reads: Tuesday Tip! A new year is a great time to stock up on retiring In-Color paper, ink and ribbon (and earn Sale-A-Bration rewards too!).

This year we're saying good-bye to 2020-2022 In-Colors Bumblebee, Cinnamon Cider, Just Jade, Magenta Madness, and Misty Moonlight. Aw! I really liked this set with the exception of Magenta Madness.

Tuesday Tip--retiring In-Colors

Until next time...
Your Friend, Christine

Tuesday, 4 January 2022

It's 2022--Time to Sale-A-Brate!

Here to brighten winter blues is the Stampin' Up! January-July Mini Catalogue along with Sale-A-Bration! It's that time again receive free bonus products with a qualifying order. As a demonstrator, it's often hard for me to sit on all this fun stuff until the release date. So, don't hesitate and hop on over to Stampin' Up's website to check it out or contact me for a catalogue.

New Stampin Up catalogue cover

Your Friend, Christine

Saturday, 18 December 2021

2021 Stampin' Up! Christmas Cards from Your Friend, Christine

Oh my goodness, the ol' blog was getting dusty! I took some more classes this year and unlike last year, they were in-person. No more rolling out of bed at 7:30 to fire up the tablet for an 8:30 start. Now it was get up at 6:15am, actually get dressed like a human being, and run out to catch the bus like it was 2019 or something :-D

All this back and forth on top of work took up creative energy. It's important, especially at this busy time of year, to remember that there are several different kinds of rest. We might be getting plenty of sleep, but still remain tired. If that's the case, it's possible mental rest is required. And goodness knows, I took in too much screen time, oof.

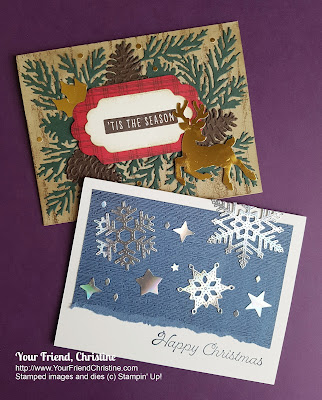
I'll be sending out more New Year's cards than Christmas cards this year, even though I started early, I couldn't find the energy to keep the festive train going. Ah well! As a friend said, "The people who love you will understand and when your ready to send cards they will be happy to receive them." Aw! With that beautiful thought, here are the two designs which may show up in friends' mailboxes next year :-)

Two Christmas cards


Tis the Season works on so many layers and works on many layers too! I started with a Crumbcake base and stamped, also in Crumbcake, using the big Birch background stamp. Layers of diecuts in Evening Evergreen and Early Espresso set the festive mood using Christmas Pinecone dies. A matching set of labels from Seasonal Labels and a sentiment from Christmas to Remember builds the scene. I don't know about you, but Christmas sentiments always get a free pass! Some gold foil paper scraps and the Deer Builder Punch brings the bling! There's a tiny dot for Rudolph's nose which is perfect for the extra highlights.

Now, the other card, Happy Christmas, is much simpler, but also eye-catching. I like to design cards for everyone to make--something for those who like a challenge or those new to cardmaking. I really hope maybe by 2023 an in-person stamp camp will be possible. Not only do I miss my crafty pals and stamping sisters, but I miss teaching. This card shows off embossing, sponging and die-cutting, three super essential cardmaking skills, IMHO! It's also super thrifty when it comes to cardstock. Simply cut and score a bunch of bases. Cut rectangles about 5x4" from aother colour (or DSP). Sponge the rectangle with your choice of ink--in this case, Night of Navy and some silver on Misty Moonlight cardstock--and run through an embossing folder with a slight textured background. I used the discontinued Subtle embossing folder, but Merry Melody or Bark would also work. Carefully rip one edge of the rectangle, just enough to make a fancy edge and leave room for a sentiment. Apply your favourite diecuts--it doesn't have to be snowflakes--and your flashy card is done!

Hopefully my next post won't be so long in-between--until then, have a safe, happy and festive Christmas and see you in the new year!

Your Friend, Christine

Sunday, 15 August 2021

July's Stamping Project--Sweet As A Peach

Here’s a project where putting in the effort really pays off. It may seem like it has a lot of fussy steps, but you’ll definitely refine your sponging technique to create some beautiful cards! In case you're wondering, the sketch for this card is from the bottom right corner of July's Sunday Sketches.

Materials
Instructions
  1. Score 8.5x11” sheets of Crumbcake and cut in half to make 12 4.25x5.5” bases.
  2. Before folding card bases, stamp all over the front side in Crumbcake with the spotty stamp from Color & Contour (or any kind of spotty stamp you have on hand).
  3. Stamp the front edges of the card with the Birch background stamp in Crumbcake ink next.
  4. Cut 12 3.25x4.75" Very Vanilla pieces and die cut with second largest scalloped die from the Scalloped Contours set.
  5. Get ready to sponge! Sponge Balmy Blue ink  onto the scalloped Very Vanilla fronts using the straight edge of a piece of scrap paper to cover the scallops. Of course, you don’t have to do this—-make it your own and sponge all over the place! Work from the outside in.
  6. Stamp 24 single large peaches on Very Vanilla cardstock and die cut.
  7. Stamp 24 branches on Very Vanilla cardstock in Soft Succulent and die cut.
  8. Stamp 12 two leaf leaves on Very Vanilla cardstock in Soft Succulent and die cut.
  9. Sponge a little bit of Daffodil Delight, Crushed Curry and Mango Medley ink on the large peaches to give them some dimension and colour.
  10. With the light yellow-green pencil crayon, colour lightly on top of the Soft Succulent leaves to add some warmth and dimension to the leaves.
  11. Cut 12 0.75x2.25” Very Vanilla tags for sentiments. You can make them longer if you want to extend them across the front of the card. I used Early Espresso and Evening Evergreen ink for the sentiments.
  12. Stamp 12 sets of large blossoms on Very Vanilla cardstock and brush white acrylic paint onto each petal.
  13. Time to assemble!
  14. Affix the Very Vanilla fronts to the Crumbcake bases.
  15. Divide the peaches into two piles. One peach will be the front peach and one will be the rear peach.
  16. Glue a two leaf die cut to the top of the front peaches.
  17. Glue a peach to each of the branches and let dry.
  18. Glue the top peach branch to the rear peach branch. You can arrange them as you like. If you want to position them all the same, glue one set together for a model and then place a piece of wax paper over top and match each successive set together.
  19. Add blossoms where a gap in the branch shows or wherever you feel like it!
  20. Affix the sentiment and you’re done!


If you’re not completely tired of sponging by now, you can sponge a little Crumbcake ink around the edges of the card—I bet even a little gold would look great too!

The Sweet As A Peach set is a great bargain too. Not only do you get a nice number of nature images, you get plenty of sentiments for any occasion too!

Your Friend, Christine

Sunday, 18 July 2021

July's Sunday Sketches

Every weekend has been pretty lazy so far this summer. We're still working from home and sometimes I think we just work so hard on the weekend that our hobbies are suffering during the days off. Or, you know, it could be the blistering heat waves or wildfire smoke that's sapping our energy lately.

I sketched out four ideas tonight and I'm not sure which ones will become a reality--stay tuned!

Four cardmaking sketches


Your Friend, Christine