I am a quasi-hobby independent Stampin' Up! demonstrator. I do not book parties but I specialize in one on one instruction plus I still wanted a space to show off my cards and share advice about stamping and papercraft. Enjoy! All stamped images and paper are (c) Stampin' Up.

Shop Now

Click here to shop Stampin' Up. You can order stamps and supplies without having a party and still get Stampin' Rewards.
Showing posts with label cards. Show all posts

Friday, 21 February 2025

Flashback Friday--Keep a little Christmas cheer all year

I love Christmas and keep Christmas cards up all year--but this year, with the Canada Post strike, I really enjoyed the Christmas cards I received from my stamping friends :-)


Until next time...

  Your Friend, Christine

Thursday, 23 January 2025

January Stamping Project--Happy Birthday and Thank You

It was a slight blessing to come down with a nasty cold after Christmas, but still not a fun way to start the new year! Sometimes all you need is ink, stamps and cardstock to make some fun cards. As you can imagine, I wasn't feeling very ambitious while sick, but I also wanted to try out the new stamps I ordered, Thanking You and Simple Birthday.

These two giant stamps fill a quarter-fold card nicely and if you make 5x7" cards, you'll have lots more room for layering! I used two of the new Sale-A-Bration freebies, Corner in Bloom and purple adhesive backed sequins, to stamp a border around the cards in Pretty in Pink ink. Materials

 
Your Friend, Christine

Friday, 3 January 2025

Flashback Friday--Dove of Hope Bundle

If you're like me, you have baggies of unfinished ideas or extras that never quite made it into a finished project. I started writing about these projects because, as we enter a new year, there's still value to them. Or, also "late for this year, early for next", as I like to say!

I don't even remember cranking out all the die cuts from SU's Dove of Hope Bundle, a unique set where the dies didn't completely match the stamps. All it took was a little Tombow, a little Wink of Stella and an afternoon to assemble them and a couple made it onto cards. Because of the Canada Post strike, I didn't make a full set of cards, but I think with some festive ribbon, the doves would make great ornaments too!

To complete the card, I cracked open a package of last year's O Holy Night DSP. Using up DSP will be another topic for another time, but I used one of the starry sheets with lots of sponging! It's hard to tell in the photo, but I sponged Night of Navy, Misty Moonlight and even a little Orchid Oasis ink around the edges. The effect toned done the whiteness of the stars and yes--you can sponge ink on dark papers for a vignette effect.

Flying dove Christmas card

Until next time...

  Your Friend, Christine

Sunday, 22 December 2024

Let It Snow Christmas Card with Reindeer Fun

I'm always a little secretive with my Christmas cards because it's so hard to keep things a secret on social media. We just all want to share so bad and smartphones are super good at making it easy!

Now that the Canada Post strike is over, I just don't feel like sending out my Christmas cards, aw! Here's one that was waiting in the wings using Reindeer Fun and a Memories and More card from last year or the year before. Memories and More cards are so handy when you need a right-sized background...or foreground! You can't go wrong with having some holiday themed ones on hand for a quick card.

Reindeer frolic in Christmas wonderland

Merry Christmas and happy holidays!

  Your Friend, Christine

Friday, 13 December 2024

Flashback Friday--Spring Birthday Accordion Fun Fold Card

Here's the big reveal from my last post, Sunday Sketch--Spring Birthday. Never ever have I made a card like this before, and you can see why it was six months late :-D

This amazing fun fold card is an accordion fold card. You can make accordion fun fold cards with or without the interlocking middle panel and windows. A quick Google will give you lots of inspiration.

Blue and pink happy birthday card with a hummingbird on a flower


This card was so amazing I made a video of it as it was hard to photograph.


Some more photos--click for full-size:

It's a little difficult to give exact instructions as the card was received, but I can give some general guidelines. I enjoyed the design and assembly challenge immensely. With this card, remember you are designing a front, four middle panels, the accordion and potentially the backside. Although I stamped the inside accordion, you'll see many stampers use scrap DSP instead. Go with whatever makes it special--the windows don't need to be a rectangle either!

  • Take time to make a model card from scrap cardstock to work out the measurements. As I used one of the Ornate dies for the window frame, I had to make the cut out slightly smaller.
  • The card is still 4.25x5.5" when folded. I used a 12x12" Very Vanilla sheet to cut a regular base and then I made another base with the left side 0.5" longer so I could attach them together to make one long accordion.
  • The inside accordion is 2" tall and originally had six panels--but I realized four would work.
  • Use a quality adhesives like tear tape or Tombow to keep the card together ;-D

Seriously, I felt like I used every stamp in the stash! I ended up taking group photos of the stamp sets so I would remember :-D Current ones are linked:
Other details:
Would I make another accordion fun fold card again? You bet!! I loved all the different elements and space to work with, plus they have so much potential and possibility! One could easily make a mini scrapbook or gift book for someone or create a seasonal display too.

  Your Friend, Christine

Sunday, 8 December 2024

Sunday Sketch--Spring Birthday

LOL this is a belated sketch for a belated birthday card--look for a post about this very special and complex card. You'll see why it was six months late :-) The complexity of this card required the inside to be designed, which was actually quite easy. The front, however, remained quite elusive and it was the last part of the card to be finished.

Sketch of a floral birthday card

Stay tuned...

  Your Friend, Christine

Friday, 6 December 2024

Flashback Friday--Inspirational Sketches

I've been meaning to post this little card for ages. I made it back in spring 2024 when I had friends over for crafternoon. I was working on something else, but I just had to make a card! Sometimes it's easier to make a complex card than something simple--but all you really need is ink, stamps and paper. I love birds--I've had budgies since I was a kid--and I enjoy wandering the wilderness and urban areas to catch a glimpse of them. I may not be the most hardcore birder out there, but nature reminds us to take it slow, take it easy and move at our own pace :-)

The house sparrow from Inspirational Sketches is just the right size for a vertical or horizontal card--and just realistic enough for me. Although I like birds, it has to be the "right" kind of bird stamp for me to add to my collection.


Until next time...

  Your Friend, Christine

Friday, 6 September 2024

Flashback Friday--Peaceful Cabin and Winter Gifts

Today's Flashback Friday revolves around last year's Peaceful Cabin stamp set from Stampin' Up!. Peaceful Cabin was very popular with crafters, especially for rustic scenes rendered in grey and blue. There's just something about the cabin that takes the mind away to...well...a peaceful place!

These cards were destined to be unfinished forever until this past week. Sometimes an idea or sketch (or both!) doesn't work out the way you envisioned it. Staring down the card bases, I knew they needed just a little more effort to be complete. I even stamped out sentiments. It just wasn't going to work out.
Peaceful Cabin card in progress

I put them aside once more and worked on another unfinished project--2019's Winter Gifts Paper Pumpkin. This fun set made 20 gift tags and there were plenty of "spare parts" still in the box even though I made a few. Gift tag Paper Pumpkins are fun because you can make awesome card fronts from them. As luck would have it, I found a stack of pre-cut bases and stamped and glued. Winter Gifts' stamp set included a scripty "Let it snow" sentiment and I used it on ten cards, such as the ones below:
Let it snow Christmas tag cards
Then, I realized it was the PERFECT message for those Peaceful Cabin bases. I stamped another five let it snows, and from Peaceful Cabin, stamped a bunch of pine trees and added the little fox to the corner of each card. Silver ink snowflake dots finished off the scene--done!
The bases went from blah to beautiful in an afternoon. Don't give up on those unfinished projects--maybe they just need some extra time or a change of direction. As crafters love to say, late for last year, early for next!
Until next time...
Your Friend, Christine

Friday, 30 August 2024

Flashback Friday--Rocking Horses Christmas Cards

I haven't posted a cardmaking how-to in ages! Last year's health problems tanked my energy, and when my energy returned, I faced a new problem--I just couldn't seem to make a card!

I caught up on some Paper Pumpkin kits, but designing my own cards and choosing different colours, stamps and ink seemed to escape me.

How is it possible to have a whole room dedicated to stamping and not...stamp?

Funnily enough, I found my road back from an unlikely source. If you haven't seen the new Simone Biles documentary on Netflix, I highly recommend it. Although I'm not a huge sports fan, I enjoy Netflix's sports documentaries, from The Last Dance to Untold. I've always loved biographies and stories about people overcoming challenges. My challenges seemed so small compared to highly paid, highly talented, and, sometimes, high-flying athletes, but we're all human. Something about Simone Biles' struggle resonated with me. After her case of twisties, she returned to the gym and slowly regained her skills and confidence.

Crafting was my sport. It used to be so easy--what happened?

Perhaps cleaning the craft room would help. I came across many baggies of festive spare parts and bases that had been started. All they needed was the tiniest bit of time and effort to put them together. A sentiment here, some bling there--and voila! I made some cards! The original use for the spare parts long forgotten, I just arranged things until they looked pleasing and committed to gluing them down. Soon I had a stack of Christmas cards and pride in finishing unfinished projects. Are you even crafting if you don't have unfinished projects? 😄

So, here's a little Flashback Friday for one box of spare parts contained coloured rocking horses, stamped and sponged background layers and cut white paper and vellum.

Here's a reminder of the Sunday Sketch I posted last year, using the Rocking Horse set:
Sunday sketch of a rocking horse Christmas card

I made these pieces in 2023:
  • background layer stamped and sponge with Poppy Parade (one Cherry Cobbler is the exception)
  • white copy paper and vellum (cut at the same time so the layers matched perfectly)
  • rocking horses stamped with Early Espresso on Basic White and Crumbcake cardstock

To complete the project, all I needed to do was add:
  • six bases from three 8.5x11" sheets of Cherry Cobbler cardstock
  • stamp the white paper and stamp a sentiment with Early Espresso
  • punch gold stars from scrap gold paper

Then, to assemble, I:
  • attached the Poppy Parade layers to the Cherry Cobbler bases
  • placed tear tape on the back of the rocking horses and carefully adhere the vellum layer to the paper layer
  • trimmed scrap DSP and cardstock to mount the sentiments
  • placed the stars and used metallic ink to dot the vellum layer

It took an afternoon, but the card I envisioned last year is ready for this year. Sometimes breaking a big idea down into the tiniest task helps too.

Rocking horse Christmas cards


Christmas tends to get a free pass in my Stampin' Up! collection and you can see why--sometimes you just need those little star stamps from older sets. Finding just the right stamp in my collection for the floor truly felt like a win too.

Group of discontinued stamp sets

Maybe I was too caught up in perfect, maybe I just needed to reconnect to the joy in finding something I still do love. It's okay to take breaks and okay to start again--even when life is challenging and doubts loom large. Self-kindness, focus and perseverance can go a long way to reaching a goal, whether it's on the gymnastics floor or the craft room :-)

Wednesday, 26 April 2023

March/April's Stamping Project--Hoppy Easter

As I often like to say, late for this year early for next!

I planned on making a dozen Easter cards as I hinted earlier in a blog post. Only four were delivered, oops.

Six were made with Fresh Freesia and six with Pale Papaya inks and cardstock. Remember Pale Papaya is a departing In-Colour while Fresh Freesia joins the Subtles line. These cards were tricky even though they were sketched out beforehand. I wasn't completely happy with how they looked. Also, silly me, I mismeasured the scalloped pieces. Instead of using the right-size die, I used a slightly smaller one. So not only did I run into design problems, there were technical challenges. It's an inevitable part of the creative process and not always a bad thing.

The sentiment, flowers, and rabbits are stamped with Early Espresso ink. I love the warmth Early Espresso brings to cards because it's not as cool or stark as black. I also used another departing die set for the branches and once I added the branches into my design I liked it a lot more.


Now, Full of Love is a retiring item, but I want to spotlight it, because as a thrifty crafter, I appreciate double duty sets. If you carefully ink the floral parts, you now have eight different edges for borders. The thin line style also coordinates with other thin line stamps in my collection. When looking through the catalogue, think beyond the literal image and you may surprise yourself with all the possibilities!

Supply List for 12 cards
  • Three sheets of 8.5 x 12" Fresh Freesia cardstock
  • Three sheets of 8.5 x 12" Pale Papaya cardstock
  • 1 12x12" sheet of Basic White cardstock or large white scraps
  • Fresh Freesia, Pale Papaya, and Early Espresso inks
  • Full of Love stamp set
  • Easter Bunny stamp set and Bunny Punch
  • Scalloped Contours dies
  • Hand-drawn Dots background stamp
  • Any die set that contains branches
  • Lightweight vellum or white office paper
  • Stamparatus
  • Sponges for inking
  • Chalk pastels or other colour tools
  • Dimensionals and other adhesives
  • Scoring, cutting, and sponging tools

Instructions
  1. Score each sheet of cardstock in half but don't cut the sheets in half just yet.
  2. Stamp with matching ink all over the right side of each sheet using the Hand-drawn Dots background stamp. Stamp on and stamp off to create an overlapping pattern. I stamped more around the bottom edge of the card to create a gradient effect. Once you are happy with your stamping, cut the sheets in half to make 12 bases.
  3. Die cut 12 scallop shapes from the Scalloped Contours set using the 3.25x4.5" die.
  4. Cut 12 2.5x3.75" rectangles from basic white cardstock.
  5. Cut 12 2x3.25" rectangles from basic white card stock.
  6. Sponge the corresponding rectangles with either Fresh Freesia or Pale Papaya ink. Feel free to mix or match as you desire--after all, it's your card :-)
  7. Stamp the edges of the white rectangles, both large and small, with a stamp from Full Of Love, using Early Espresso ink.
  8. Stamp your Easter sentiment in Early Espresso ink, centering it on the smaller rectangle. A stamping platform like the Stamparatus is a great helper here.
  9. Stamp 12 rabbits in Early Espresso ink and punch them out with the coordinating punch. I used chalk pastels to color the rabbits. You can use pencil crayons or watercolour pencils. The fun thing about pastels is that they leave a soft look and you can erase color away to make some interesting patterns and shapes.
  10. Die cut 12 sets of three branches from your chosen set. You can use any die cut set you have on hand which will make a nice silhouette--leaves, branches, flowers, or whatever you like. I used light opaque vellum that I had some scraps of but office paper or scraps of white cardstock also work.
  11. Sponge around the card bases with matching ink. You can even sponge the edges of the scalloped pieces to give them a little oomph!
  12. Now all the pieces are cut and coloured, it's time to assemble them. I found it easy to assemble the scalloped card fronts before attaching them to the base.
I really liked the Easter Bunny stamp set. It's just the right amount of cute and fun for me--sometimes I'm a little picky when it comes to cute and fun :-) It would be super fun to get some tiny googly eyes and put them on the rabbits in the set!

Until next time...

Your Friend, Christine


Wednesday, 29 March 2023

February's Stamping Project--Helping Others

LOL, this isn't a mistake that February's project is being posted in March. February, I admit, was a tough month. Not only is it such a blah month, and often a cold one in Calgary, but it felt longer than usual as an older family member passed unexpectedly and my attention turned inwards instead of outwards.

I felt extra committed to finishing two projects, though, oe of which was creating a pile of masculine cards for a local charity, Seniors Secret Service. They send out a few hundred birthday cards monthly and I thought it would be fun to make and donate some cards. It turns out they have a need for masculine cards. Masculine cards are always tricky--while earthy and bold cardstock colours are available, the stamps, sentiments, and papers are often missing. I've noticed over the past few years that supply companies, and especially Stampin' Up!, are stepping up to fill this gap.

My friend lent me her scrap box, and I swear another’s person stash is always more interesting than one’s own 😃 It was full of discontinued Stampin’ Up! papers and cardstock which I found super exciting. I busted into my own stash and found some nice kraft cardstock that complemented the Pool Party papers. I cut up some bases, cup up some strips and starting assembling without worrying too much about the layout–-just keeping it simple, you know? I didn’t want to get hung up on the design too much, so I pulled out a current set, Wildlife Wonder. Not only does it have a nice, big bear, but it also has some perfect sentiments such as to a great guy and sending birthday wishes.

I stamped the bear on Very Vanilla cardstock with Early Espresso ink and fussy cut them out. I thought about placing a sentiment on the card, but decided to leave it as is, in case the Seniors Secret Service staff needed the cards for a general hello.

Thinking of others and making something helped me get through February. Every day I reminded myself spring is around the corner and every day truly is getting a little lighter and brighter as spring approaches in her incremental ways.

Masculine bear cards

Until next time...
Your Friend, Christine

Monday, 16 January 2023

Happy New Year's Card--Yes, I Send Them :-D

I always laugh and tell people if they didn't receive a Christmas card, they're probably on the list for a new year's one.

Starting Christmas crafts in July isn't a guarantee one will be done in time for the holidays, and, to be honest, once I let go of the pressure to make Christmas cards, I felt so much happier. In fact, I think the new year's cards turned out better than the Christmas ones!

There's no shame in sending a New Year's card--after after Christmas fun, frolic, and feasting, it's kind of nice getting a bonus card in the mailbox IMHO.

These cards started out as Christmas cards but it was easy to change them up. I started with six Basic White and six Very Vanilla cardstock bases.

I used the stamps (as well as dies) from the Christmas Lights bundle and some silver ink to stamp the top and bottom of the bases. Then, I cut up gold and silver metallic dotted paper from the fall Sale-A-Bration freebie DSP pack.

My main goal was using up all the metallic scraps hanging around the craft room and I succeeded! There were enough scraps to make gold, silver, blue and light purple snowflakes large and small. I used all the snowflake dies in my collection by the way.

New Year's stamps aren't super popular, so I saved myself some time by printing a sentiment in a colour close to Early Espresso and cut out each tag.

However, I had a problem--I had big shapes, little shapes, stamped images and DSP--all good things. Something just didn't look right and after chatting with a friend, I decided to add some more snowflakes in matte colours.

Diving into the scrap basket, I found small pieces of Night of Navy, Misty Moonlight, and Purple Posey to die cut. The flat, solid colours tempered the shiny elements.

Lastly, I glued thin metallic strips under the tag to make another reflective surface and make the tag stand out more.

Just like snowflakes, each of the twelve cards were different. Click the image for larger size.

Have a shiny 2023 friends!
New Years Greeting Cards


Your Friend, Christine

Tuesday, 3 January 2023

Some Festive Stragglers :-)

It makes sense that there's a little bit of 2022 coming into 2023! The problem with being so sick is forgetfulness--and somehow I totally forgot about these three designs I made back in...October? I would have liked to make more, but they are just one-offs.

The two cards below use Snowflake Vellum Paper. The catalogue photo didn't do this paper justice in my opinion--it's so pretty! I used some scraps of metallic and glitter cardstock to add snowflakes from older sets.                   


In the horizontal card, you can see where I tried stamping the Basic White Base before putting the vellum on top. I'm not sure how well this worked out, but I would try the technique again. Vellum is perfect for toning down colours or shapes.


Lastly, if you purchased some Boughs of Holly paper, you may have fallen in love with the poinsettia patterns. One sheet in particular offered lots of fussy cutting fun, as you can see here! The Shaded Spruce die cut and stamp are from the Merriest Moments bundle, which features stamps, dies, and an embossing folder. It debuted in 2021 and was actually a returning favourite in the 2022 August-December Mini Catalogue. Returning favourites don't often happen, but sometimes they do :-) I sponged the Shaded Spruce die cut with some Evening Evergreen to tone it done a little. Dots of copper ink complete the festive mood. 


So, for sure that's a wrap on 2022's holiday cards. Time to get ready for the new year because it's going to be time to Sale-A-Brate verrrrrry soon!

Your Friend, Christine

Saturday, 24 December 2022

Feeling Festive and Festive Feelings!

Adding to my perpetual feeling of being behind on posts, ideas, and more--well, after dodging the plague for two and a half years, it struck our household and despite what some may say, it affects people very differently. Hubs slept most of the symptoms off in four days and has a lingering cough. For me, COVID ran the whole ten days. I was super thirsty, napped a lot, and lost my appetite. Then, afterward, I was unbelievably tired and constantly reminding myself to take it easy. I'm only now finally feeling 100% again. We were doing all the right things, but our luck just ran out!

One of my favourite holiday suites this year was the Santa Suite. I wanted to do a whole video about it because I thought the whole ensemble was just wonderful. It just has so much possibility and I hope Stampin' Up! makes more suites like it.

There was co-ordinating paper for die cutting shapes and stamps perfect for colouring! Other elements included envelopes and a Memories and More pack with matching and retro elements. Originally, I wasn't sold on the Parakeet Party sky, but once you put it all together, it just works! Here are two samples while spending the afternoon with friends, who went wild for the set. Despite the two other ideas I had, all we worked on was the trains :-D
Santa train Christmas cards
Here are two cards made with metallic snowflakes and two of the Santa Suite Memories and More cards. When you're pressed for time, a card from one of these packs often has the right message or image you need. They're such good value IMHO.
Two Christmas cards
Lastly, here are two cards made with DSP from the Lights Aglow suite. This festive paper with a touch of gold was super popular. Consider yourself lucky if you snagged a pack because it was unavailable and not restocked. I used some scraps from the stash for the letters. I'm not 100% sure they're finished--but they are lovely!
Dark green Christmas cards reading Joy in red letters
Sadly, I didn't send out as many Christmas cards as I hoped. A stack of bases will become New Year's cards. Fortunately October's Paper Pumpkin came to my rescue. This kit made 9 cards and the Santa theme was great for my friends with children. Did you know, by the way, you can gift Paper Pumpkin? They're also great to have on hand for yourself or to share with others :-)
That's a wrap for Christmas crafting in 2022! Have a healthy, joyous, and wonderful time with your loved ones!

Your Friend, Christine

Monday, 15 August 2022

Summer Card Swapping!

One of the fun things about Stampin' Up! is being able to live my values which corresponds pretty handily to SU's "inspire, create, share". I love sharing knowledge (even in my day job!), I enjoy a creative and colour ful life and I love taking in inspiration from others and sending it back out into the world.

I haven't done a team swap--or even a group swap--in forever, so I jumped at the chance back in May to sign up for one. Swaps are a great way to try a new technique or use up some supplies and the theme for my swap was use your oldest, uninked set that's still in the current catalogue..

Challenge accepted! It turned out my oldest, uninked and still current set was Jar of Flowers which also has a matching punch. I had to sneak a sentiment from another set as Jar of Flowers does not contain any. While I sketched the card to be horizontal, it would have been much easier to create it vertically. Once the flowers go on top of the jar, it's easy to run out of space. I made four of each flower for some variety.
Pair of floral handmade cards
It took a while to patiently wait for the other swaps to come in and each one was a delight to receive! Thanks gals!

Pair of handmade cards
And the last card came in after I made this post :-D

Don't worry, the Santa Suite blog post is coming soon!
 
Your Friend, Christine

Tuesday, 7 June 2022

June Projects--Exploring the New In-Colors Part 1

I admit I’m not sure what to do with the new In-Colours! Most demos had samples made up back at the beginning of May, but not me—I just didn’t know where to start. The past few years of In-Colours have been somewhat muted, so I suppose this year SU had to crank up the volume.

So far, however, I have two samples featuring Sweet Sorbet and Parakeet Party. Combining the Sweet Sorbet DSPs—with a touch of Evening Evergreen on the middle stripe—contrasted nicely with the solid Parakeet Party cardstock.

Red strawberry themed Sweet Sorbet card with a Very Vanilla base
And a nice big piece of Parakeet Party DSP added some cheer to a Very Vanilla base and die-cut layer.
Very Vanilla and Parakeet Party card featuring stamped budgies

Stay tuned--I’m sure by next post I’ll have tackled the three blue hues!
 
Your Friend, Christine

Saturday, 18 December 2021

2021 Stampin' Up! Christmas Cards from Your Friend, Christine

Oh my goodness, the ol' blog was getting dusty! I took some more classes this year and unlike last year, they were in-person. No more rolling out of bed at 7:30 to fire up the tablet for an 8:30 start. Now it was get up at 6:15am, actually get dressed like a human being, and run out to catch the bus like it was 2019 or something :-D

All this back and forth on top of work took up creative energy. It's important, especially at this busy time of year, to remember that there are several different kinds of rest. We might be getting plenty of sleep, but still remain tired. If that's the case, it's possible mental rest is required. And goodness knows, I took in too much screen time, oof.

I'll be sending out more New Year's cards than Christmas cards this year, even though I started early, I couldn't find the energy to keep the festive train going. Ah well! As a friend said, "The people who love you will understand and when your ready to send cards they will be happy to receive them." Aw! With that beautiful thought, here are the two designs which may show up in friends' mailboxes next year :-)

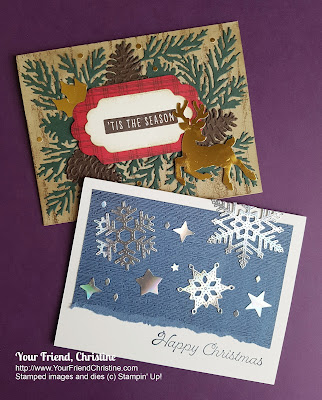
Two Christmas cards


Tis the Season works on so many layers and works on many layers too! I started with a Crumbcake base and stamped, also in Crumbcake, using the big Birch background stamp. Layers of diecuts in Evening Evergreen and Early Espresso set the festive mood using Christmas Pinecone dies. A matching set of labels from Seasonal Labels and a sentiment from Christmas to Remember builds the scene. I don't know about you, but Christmas sentiments always get a free pass! Some gold foil paper scraps and the Deer Builder Punch brings the bling! There's a tiny dot for Rudolph's nose which is perfect for the extra highlights.

Now, the other card, Happy Christmas, is much simpler, but also eye-catching. I like to design cards for everyone to make--something for those who like a challenge or those new to cardmaking. I really hope maybe by 2023 an in-person stamp camp will be possible. Not only do I miss my crafty pals and stamping sisters, but I miss teaching. This card shows off embossing, sponging and die-cutting, three super essential cardmaking skills, IMHO! It's also super thrifty when it comes to cardstock. Simply cut and score a bunch of bases. Cut rectangles about 5x4" from aother colour (or DSP). Sponge the rectangle with your choice of ink--in this case, Night of Navy and some silver on Misty Moonlight cardstock--and run through an embossing folder with a slight textured background. I used the discontinued Subtle embossing folder, but Merry Melody or Bark would also work. Carefully rip one edge of the rectangle, just enough to make a fancy edge and leave room for a sentiment. Apply your favourite diecuts--it doesn't have to be snowflakes--and your flashy card is done!

Hopefully my next post won't be so long in-between--until then, have a safe, happy and festive Christmas and see you in the new year!

Your Friend, Christine