I am a quasi-hobby independent Stampin' Up! demonstrator. I do not book parties but I specialize in one on one instruction plus I still wanted a space to show off my cards and share advice about stamping and papercraft. Enjoy! All stamped images and paper are (c) Stampin' Up.

Shop Now

Click here to shop Stampin' Up. You can order stamps and supplies without having a party and still get Stampin' Rewards.

Sunday, 6 January 2019

Sunday Sketch - January Stamping Project

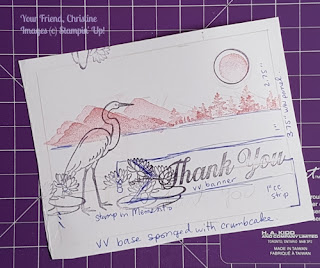
Since I always post my projects at the end of the month, I decided to share the sketch for them at the beginning of the month. Check back in a couple of weeks to see how the sketch becomes reality. This idea contains a few elements that were easier to stamp out than sketch out.

Lilypad Lake thank you card


Your Friend, Christine


Tuesday, 1 January 2019

Cheers to the New Year!

Even with the best intentions to send cards on time for Christmas, some friends slipped through the cracks. A new year's card is a great way to send well wishes and in this case, a chance to use stamps from my collection. This design is a little different from my normal style - but it proves that very different elements can come together for a pleasing design. I chose two stamps from Gorgeous Grunge to reflect the movement of time. The giant snowflake is a focal point while an embossed panel and strip of vellum give a wintry touch. Sometimes it's all about the layers!

This project uses discontinued items, but you can still take inspiration from the colour scheme or composition.

Supply list for ten cards:

Stampin' Up! does not sell metallic ink - I used a Colorbox pad.


Cheers to the new year!
Click for larger

  1. Score five sheets of 8.5x11" Whisper White cardstock down the middle and cut in half to make ten card bases.
  2. Cut 2-3 sheets of 8.5x11" Pool Party cardstock into ten 3.25x4" panels.
  3. Emboss the Pool Party panels with the xxx embossing folder. You can sponge the edges with Pool Party ink or stamp the embossing folder with ink to leave a gentle touch of ink upon the embossed surface.
  4. Cut 10 x strips of vellum cardstock.
  5. On scrap pieces of Whisper White cardstock, stamp the radiating circle from Cheers to the Year in gold metallic ink. Inside the circle, stamp the sentiment in Fresh Fig. Punch out the circles with the circle punch.
  6. Die cut 10 snowflakes from a 12x12" sheet of silver foil cardstock. To minimize waste, trace around the snowflake on the blank side and cut by hand.
  7. Now, this is where the Stamparatus came in handy! Position a card base on the platform and line up the horizontal line stamp past the edge of the bottom left side. Ink it up with Pool Party and stamp stamp stamp! Do the same for the slanted line stamp, but on the top left hand side and bottom right hand side.
  8. Stamp the horizontal line stamp about midway on the right side of the card base.
  9. Center the embossed panel on the front of the card and stick down.
  10. Most adhesives will show through vellum, so just put a small piece of tear tape where the snowflake will be mounted.
  11. Mount the sentiment to the snowflake and then place the snowflake on the right side of the card. Try experimenting with tilting it until it looks just right.

All the best for 2019 stamping friends!

Your Friend, Christine


Sunday, 23 December 2018

2018 Christmas Cards

Whew! November and December were busy months. I hardly had a chance to sit down and do the banking.

I sat down and made a few Christmas cards and now that they have been sent off, I can share them. Click for larger. Here is this year's Christmas card:

Christmas Wishes card featuring pine tree die cuts
Christmas Wishes

Here's another card I made, but I didn't get around to sending any of them off. Oh dear! Late for this year, early for next, I always say. I like the tone on tone look and the shimmer paper really looked great when embossed with the Blizzard background thinlits die.

White Christmas deer card


Have a safe and warm holiday season! Stay tuned for new exciting products in 2019...the Sale-A-Bration catalogue drops January 3rd :-)

Your Friend, Christine


Wednesday, 31 October 2018

October Stamping Project - Take Your Pick Tool Sipcase

October's project is a little different! It's easy to forget that papercraft is more than just cards :)

I learned from one of my team mates that it is totally a thing to make a box for your Take Your Pick Tool as the original box is quite flimsy. You can find the instructions on Old Stables Crafts. I took a different approach and made a slipcase for the box.

This is where the minute measurements of the Simply Scored board really shined.

I measured a sheet of Berry Burst cardstock against the box and carefully scored everywhere I wanted a fold. I wasn't sure how much paper I would need, so I trimmed the excess off.

Then, for the top, I personalized it with a scrap piece of Whisper White cardstock using the Petal Palette stamp set and 2017-2019 In-Color inks. Admittedly I printed out my name because it was too intimidating to stamp it out!


As for the Take Your Pick Tool itself, I love it. I love that the spatula can help you pop up any whoopsies that have been stuck down. The putty tips take the frustration out of affixing small details and it's easier to hold the bigger stylus than the one that comes with the Simply Scored board.

Your Friend, Christine


Sunday, 30 September 2018

September Stamping Project - Grateful Heart Autumn Greeting Card

As a fall baby, I eagerly collect anything fall. It’s easy to have fall overlooked with Thanksgiving, Halloween and Christmas. It doesn’t help that fall is so short where I live - all it takes is a week of strong winds and all those lovely coloured leaves are gone. This year, September has been particularly rainy, so I enjoyed working with these colours - ones that I don’t typically use.

Thinking of You with a Grateful Heart

Supply list


  1. Score a sheet of Very Vanilla cardstock, but don’t cut in half.
  2. Stamp all over the right side of the sheet of Very Vanilla cardstock with stamps from blah blah. Try stamping in Mint Macaron and Crushed Curry first, then stamp again in Blackberry Bliss but offset.
  3. When you are satisfied with your stamping, sponge around the edges with a little Cajun Craze. Cut the sheet in half and continue sponging.
  4. Cut a 2” strip from a sheet of Blackberry Bliss cardstock. Cut in half so that you have 2 2x5.5” panels.
  5. Die cut small leaf and flower shapes from Mint Macaron cardstock.
  6. Die cut a square from Whisper White using the ~2.5" (inside) square framelit. Stamp sentiment in Blackberry Bliss ink.
  7. Die cut a scalloped square from Crushed Curry cardstock using the ~3.5" (inside) scalloped framelit.
  8. Die cut maple leaves from Cajun Craze cardstock. You can also just stamp the interior shape instead of die cutting it. Try mixing and matching colours too.
  9. Time to assemble!

Now, if you are a keen SU fan, you might go, “Whoa? Mint Macaron? Blackberry Bliss? Are those current colours?” Yes, yes they are! I am especially thrilled that Mint Macaron returned along with a few other colours in the 2018 colour refresh. You can buy a sampler pack of paper, all the new inks or markers and try them out for yourself.

Your Friend, Christine


Sunday, 16 September 2018

Sunday Sketch - September Stamping Project

Since I always post my projects at the end of the month, I decided to share the sketch for them at the beginning of the month. Check back in a couple of weeks to see how the sketch becomes reality. I already gave a hint about the colours :-) A sketch doesn't have to be very detailed - just enough to capture all the information necessary.

Card sketch

Your Friend, Christine


Wednesday, 12 September 2018

Stampin' Up! 2018 Holiday Catalogue Favourites

If it's one thing that you can count on, it's Stampin' Up! to release three catalogues a year - holiday, occasions and the annual catalogue. As a demo, I get sneak peeks of all of them and sometimes it's so hard to wait to show off the new products.

I think this year's holiday catalogue is stellar and better than last year's. There's a huge variety of stamps and greetings and paper, oh my! I'm not a Halloween person, so I steer right to the Christmas stuff. It may be too early to think about Christmas, but when you're a crafter, it's never too early! Sometimes I start my Christmas cards in August :)

Anyway, here are three of my favourite items so far - stay tuned for more! All are photographed on Joyous Noel Special DSP.

Merry Christmas to All

I bought just the stamps and not the bundled dies - I thought the stamps were more worth it. Sometimes you just want a single word to build your greeting or fit your space, so I felt this was a must have.

Merry Christmas to All

Feathers & Frost

Hehe, of course I had to get this cute little set because of the birds! The swashy leaves and berries was also inspiring along with the sentiments. I really liked the "hand stamped by" set - I can see using it a lot!


Buffalo Check

This hefty background stamp reminds me of some DSP from last year or maybe it was the year before - but it came in green. Now you can have the same pattern in any colour. So looking forward to using this. I think it will go well with the Hardwood background stamp or embossing folder.

Buffalo Check

Well, there you have it! Stay tuned for more favourites and my monthly stamping project.

Your Friend, Christine